
Fitting Mike Satur's windscreen wiper mechanism
Time to complete - anything form 1 hour, or if you are like me, 2 days!
Tools required:
- Tiny flat blade screwdriver
- 12mm, 11mm, 13mm spanners or sockets
- Superglue (in case you break the scuttle panel like me)
- Phillips screwdriver
- Large spanner for wiper bolts/nuts (I used tongue and groove pliers - figure 5)
- A vice
- Small hacksaw
- Drill with various sizes of bits for drilling metal (incl 8 and 10mm)
- Loctite nut adhesive
Click on image for
larger picture
Preparing car for wiper mechanism removal
Figure 1
 1)
Figure 1 shows inside the bonnet with the black plastic shroud removed
(did this a week before without camera). You will also notice the
windscreen wipers have already been removed (very easy just remove nut
on drivers side and remove plastic cover and nut underneath on
passengers side)
1)
Figure 1 shows inside the bonnet with the black plastic shroud removed
(did this a week before without camera). You will also notice the
windscreen wipers have already been removed (very easy just remove nut
on drivers side and remove plastic cover and nut underneath on
passengers side)
Figure 2
 2)
Figure 2 shows the small plastic covers you need to remove to access
self tapping screws (I managed to break all these because I never had a
screwdriver small enough to prise them open so be careful)
2)
Figure 2 shows the small plastic covers you need to remove to access
self tapping screws (I managed to break all these because I never had a
screwdriver small enough to prise them open so be careful)Figure 3
 3)
Figure 3 shows the holes left after removing the plastic rivet clips
along the bottom of the scuttle (again take care as I broke a few of
these!!)
3)
Figure 3 shows the holes left after removing the plastic rivet clips
along the bottom of the scuttle (again take care as I broke a few of
these!!)Figure 4
 4)
When you remove the scuttle, there are little hooks on each corner
which grip onto the windscreen glass. Be very careful or you will break
the scuttle (like me)
4)
When you remove the scuttle, there are little hooks on each corner
which grip onto the windscreen glass. Be very careful or you will break
the scuttle (like me)Figure 5
 5)
Now you need to remove the large nuts holding the mechanism onto the
body. I did not have a spanner big enough so used the tongue and groove
pliers
5)
Now you need to remove the large nuts holding the mechanism onto the
body. I did not have a spanner big enough so used the tongue and groove
pliersFigure 6
 6)
Now you need to remove the bolt holding wiper motor/mechanism to the
body (I think it was 11mm)
6)
Now you need to remove the bolt holding wiper motor/mechanism to the
body (I think it was 11mm)Figure 7
 7)
Next simply disconnect the motor power supply by pressing the little
clip on top of the connector and pull a part. Now you should be able to
"wiggle" the whole mechanism out of the car. Be careful of washer jet
cables etc. Here is the removed mechanism. MAKE SURE YOU REMEMBER THE
POSITION OF THE ARMS/CENTER BRACKET ETC to save yourself 5 hours later
getting it right (grrrr)
7)
Next simply disconnect the motor power supply by pressing the little
clip on top of the connector and pull a part. Now you should be able to
"wiggle" the whole mechanism out of the car. Be careful of washer jet
cables etc. Here is the removed mechanism. MAKE SURE YOU REMEMBER THE
POSITION OF THE ARMS/CENTER BRACKET ETC to save yourself 5 hours later
getting it right (grrrr) Figure 8
 8)
Now secure the mechanism to a vice. You need to seperate the two arms
form the solid black bar of the mechanism. Luckily my long arm had
already come off (arrow) hence the reason I was fixing it. If not, I
had to just prise them apart with a screwdriver. Now drill out the free
rivet (I used a too small drill bit and ended up hacksawing the bits
off, but if you choose the right bit size, the rivet should just come
out)
8)
Now secure the mechanism to a vice. You need to seperate the two arms
form the solid black bar of the mechanism. Luckily my long arm had
already come off (arrow) hence the reason I was fixing it. If not, I
had to just prise them apart with a screwdriver. Now drill out the free
rivet (I used a too small drill bit and ended up hacksawing the bits
off, but if you choose the right bit size, the rivet should just come
out)Figure 9
 9)
Once you have removed the two arms and removed rivets, next is to
remove the central bracket from the mechanism (10mm bolt) and again,
remove rivet with a drill (8mm). Now, you need to use the drill
carefully to countersink the hole you left when you removed the rivet
(an inverted dome shape). This is to allow the 8mm bolt supplied with
the new kit to sit flush with the bracket.
9)
Once you have removed the two arms and removed rivets, next is to
remove the central bracket from the mechanism (10mm bolt) and again,
remove rivet with a drill (8mm). Now, you need to use the drill
carefully to countersink the hole you left when you removed the rivet
(an inverted dome shape). This is to allow the 8mm bolt supplied with
the new kit to sit flush with the bracket.Figure 10
 10)
And here it is with the screw countersunk into the bracket
10)
And here it is with the screw countersunk into the bracketFigure 11
 11)
Now connect the two arms to the end brackets and then attach wiper arm
mechanism to motor mechanism as you removed it. Now you need to saw the
8mm bolt (arrow) so it is as short as possible. Use loctite nut
adhesive to prevent the new supplied nut slipping off the 8mm bolt.
11)
Now connect the two arms to the end brackets and then attach wiper arm
mechanism to motor mechanism as you removed it. Now you need to saw the
8mm bolt (arrow) so it is as short as possible. Use loctite nut
adhesive to prevent the new supplied nut slipping off the 8mm bolt.Figure 12
 12)
Now you can refit the mechanism (if you are lucky) back the way it came
in. Like me, you may have to remove the long arm again, and then refit
once the mechanism is in place, or follow Mike's instructions to screw
the long arm into the mechanism to adjust its length. Reattach the
connector (press the clip on the top in to seat properly). Reattach
bolt to reattach mechanism to body and then refit as reverse of above.
12)
Now you can refit the mechanism (if you are lucky) back the way it came
in. Like me, you may have to remove the long arm again, and then refit
once the mechanism is in place, or follow Mike's instructions to screw
the long arm into the mechanism to adjust its length. Reattach the
connector (press the clip on the top in to seat properly). Reattach
bolt to reattach mechanism to body and then refit as reverse of above.Be careful when you reattach screws on top of scuttle as all mine broke the clips when screwing them back in (very fragile).
Problems you may encounter and should therefore avoid
I have mentioned most of them in the text. My main problems which made me take two days were as follows:
- 1) Removing small plastic covers on scuttle
- 2) Removing the scuttle without breaking
- 3) Use a drill which can drill through steel (not a battery one as I started with and took 40 mins to find a mains one!!)
- 4) Use the correct drill bits to remove rivets (8mm) . I ended up sawing them off with a hacksaw and it took me ages (and hurt my arms!!)
- 5) MAKE A NOTE of the position of arms and centre bracket when you remove it form the car. I never and it took me the best part of three hours to find the best position (even had the wipers starting at top of windscreen and going down to bottom when activated!!)
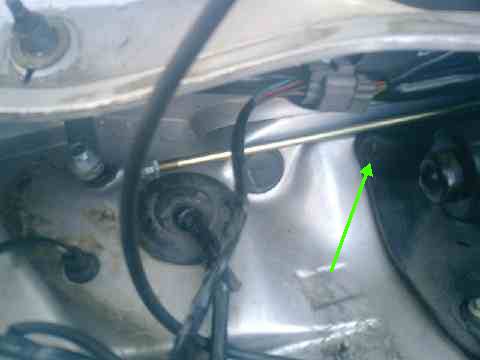
- 6) I did something very wrong and the mechanism kept catching on a bolt in the car making a horrendous noise and almostt breaking the long arm. I tried everything I could think of to stop this but ended up having to remove the bolt (I hope it is not too important) - see figure below
- 7) Dont loose nuts and bolts down the small black "pocket" shelf below the windscreen wash bottle so that you have to travel 30 mins to Focus to get new washers!!
- 8) Dont screw the self tapping screws too tight when refitting scuttle as they snap the clips really easily
*All mechanical suggestions and tips are purely for information only. I accept no responsibility for any damage to vehicles or persons as a result of any of my information. Consult a MG-Rover manual before attempting any repairs. Some repairs should be carried out by professionals only.